When Datto Screenshot Verification Fails – Flux Capacitor Error
In the movie, Back to the Future, Marty McFly accidentally gets sent from the present day (1985) back to the year 1955. Frightening at first, then perplexing, then understanding the problem, and finally how do I fix this? That’s the cycle of thoughts and emotions that fueled Marty’s behavior when facing this event. He ended up going to the source, the brains behind the time travel device, Doc Brown. Doc Brown knew how the thing worked and what it would take to “fix” the problem but the solution wouldn’t work in 1955. It was actually Marty who figured out what it would take to resolve the issue. So, we need 1.21 gigawatts of power and we don’t have plutonium easily accessible, only a lightning strike can generate that kind of power, and unfortunately, that’s something that’s extremely unpredictable. But Marty knew when and where that lightning bolt would hit, and he put two and two together. Sometimes, in the tech world, we can’t find the answer to our predicament but we can get enough information to sort it out. One of the latest and greatest pieces of technology we have available is Datto backup. Recently, for one of our clients, I was facing just such an issue.
One of the tools Datto provides is screenshot verification. Once a day, that little sucker would email us an image of a screenshot 10 minutes after boot of a protected machine. This can give you a heads up as to whether a machine may be experiencing a problem. If everything’s good, you’ll see the background image of the machine ready for it be logged on. In our case, one of the virtual servers we were protecting was giving us a blank screen indicating the boot process had a problem. Researching this particular issue at Datto’s knowledge base revealed a couple of possible solutions. One was to change the controller to a SCSI controller, which I figured was unnecessary since the process worked before and the controller was already SCSI. The other was to increase the wait time, which I did try, until I found the magic bullet. Normal wait time was 10 minutes, and I found that increasing it up to 45 minutes eventually got the successful screenshot verification back. Nothing in Datto’s KB pointed me to the cause of why this would suddenly start happening, or how to get it back to a normal boot time. I did find information explaining how the screenshot verification works, which gave me a Marty McFly aha! moment. Basically, it works like this, Datto builds a virtual machine template in KVM or VirtualBox of the machine it’s protecting, then reboots it in their virtual environment. It waits the designated amount of time, then captures a screenshot and runs a verification process against the screenshot to ensure a successful boot. It then emails you a report containing the image of the screenshot. Now, I’ll let that sit there for a moment. Why would a virtual machine go from revealing a successful screenshot of the Windows login screen after 10 minutes to somewhere north of 35-40 minutes? Then I remembered that the machine was prompting to install Windows Updates, I just hadn’t scheduled a time yet to get that done. There was no problem with the machine, Big Brother’s update process had yet again bitten us in the backside, causing our boot time issue. When the machine was virtualized in its current state and rebooted every night for testing, Windows Updates were being installed over and over and over again on that virtual template. That’s why the longer boot time was occurring, and thus, a failed screenshot until I gave a wait time long enough to compensate.
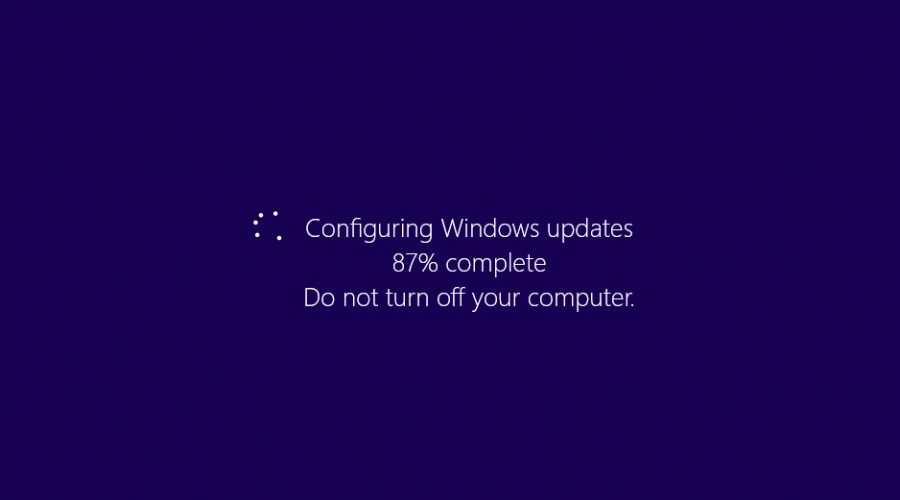
There was no documentation that I was able to find that gave this simple solution to my issue. Imagine my frustration if I had jumped headfirst into a system restore because I thought I had a corrupt server, only to find out it was just being caused by Windows Updates being queued up? Below, I will give you the 4 simple steps to rectify this situation should you encounter it.
How to fix a Datto Screenshot Verification Failure Due to Windows Server Update
- Check to see if updates have been downloaded and are waiting to be installed.
- Schedule a time and install the updates, rebooting when prompted.
- If you have extended the wait time for your screenshot verifications, reset it back to the original setting.
- Watch your email for the next screenshot verification report (you can also run a screenshot verification on demand, if you are so inclined).
That’s it. Pretty simple, right? You can’t just allow Windows Updates to install on your servers whenever Gates & Company get a wild hair, then restart them anytime of the day. You have to train them like dogs, and configure them to wait until you give the word. Then, wait to reboot when you give the command. I just hope you found this article and are reading it before you threw up your hands and decided there must be a problem with the server, and performed a system restore. Once you understand how the process functions, and you know how Windows Updates work, it’s a no-brainer. Maybe that’s why Datto didn’t include that piece of information in their KB? Nah, good documentation should be complete … unless, of course, penguins are writing it. Penguins are experts, they give you just enough information so that you know they know how to perform the operation … with their eyes closed … and one wing tied behind their back. Those of us of the Windows persuasion tend to share our findings for the good of the community, albeit some in more detail than others. Once you have your screenshot verifications showing you pretty pictures again, make sure your Windows Updates settings are configured so that you don’t get any surprises. Below are the settings to do that.
How to Configure Your Windows Update Settings to Download Only:
- Run sconfig, and hit Enter. Option 5 shows the current Windows Update setting.
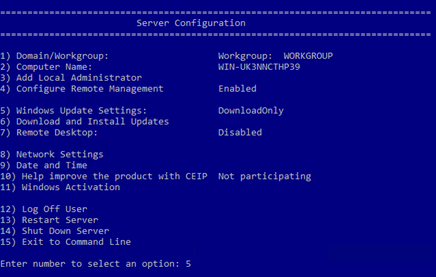
- If yours is not set as in the screenshot, enter 5 at the prompt as shown.
- You will be given options to choose from.
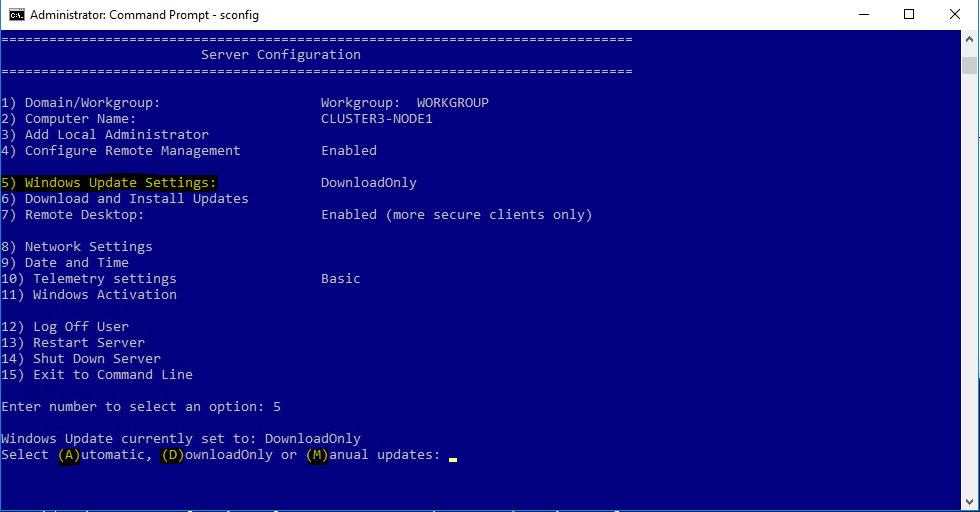
- The options are listed below:
- (A)utomatic – This will configure your machine to automatically scan, download, install and reboot after applying any updates.
- (D)ownloadOnly – This will automatically scan, download and notify the admin if updates need to be installed. This is the default setting on Windows Server 2016.
- (M)anual — This turns Automatic Updates off. Your system will never check for updates.
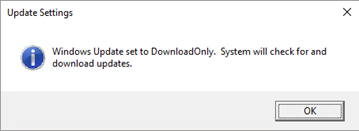
- Enter D to set it for DownloadOnly.
- When sconfig applies the configuration you selected, you’ll get a confirmation. Click OK.
Now, we need to tell Windows not to reboot until you say “go”. (You should have already set you Active hours on the Windows Updates screen. If you still want more control follow the steps below.)
- Open regedit and navigate to HKEY_CURRENT_USER\Software\Policies\Microsoft\Windows\WindowsUpdate\AU
- If the complete key path doesn’t exist, create it. Then, make sure you have all the key values listed in the screenshot. The data values should be set as shown.
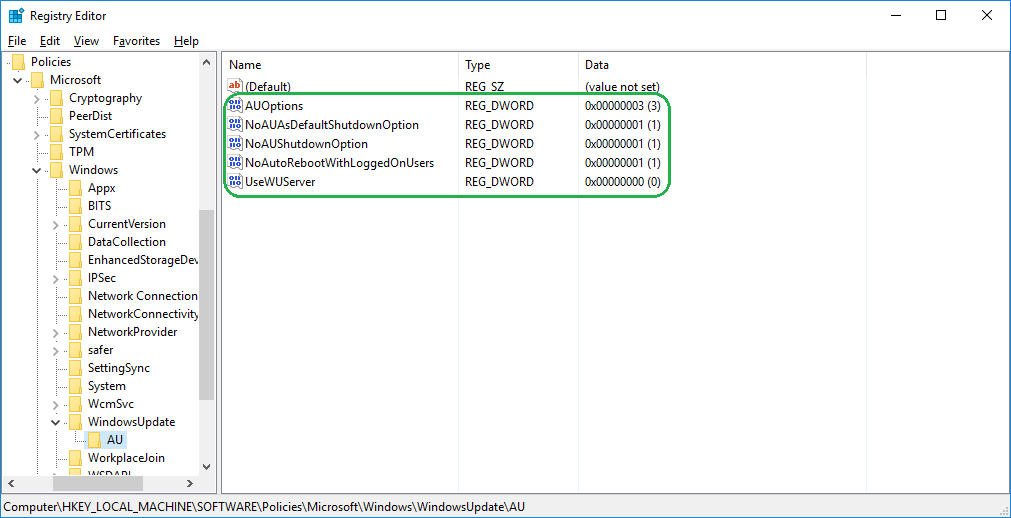
In my testing, these settings worked as desired when I actually initiated updates that took long enough that I was outside of my reboot window. Active hours were set to expire at 7 PM, but when I remoted into the server later that night to check, it was still waiting for me to give the command to reboot. As an FYI, these settings should also work for your Windows 10 machines, should you so desire.
Microsoft has given us a very limited, and not so easy to navigate, process for telling our servers how they should install updates. Production servers? No, you can’t leave them on auto-pilot for updates. In our case, a former MSP had left the servers on auto install, but configured them to prevent rebooting until the admin gave them the green light. If you have to perform an emergency reboot during production hours, your server will be out of service longer because of the updating that occurs during the reboot. Bottom line here is that if your screenshots are failing with a blank screen, check to see if your server is waiting for a reboot to finish installing updates. Install during an off-production window, and you’ll be golden. Then, configure updates to download only and wait for your command.
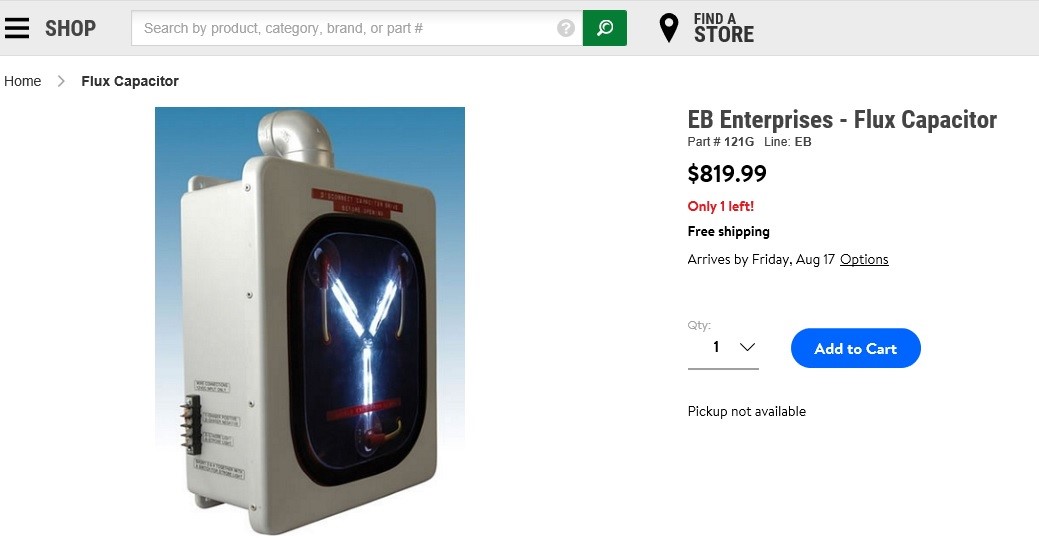
In the movie, Doc Brown needed 1.21 gigawatts of power to solve Marty’s problem. Funny word, that gigawatts. Doc pronounced it with a soft “g” sound, which was the original pronunciation. Most of us in IT are familiar with the term giga, pronounced with a hard ”g”, as in gigabyte. Most online dictionaries pronounce gigawatt with a hard “g”, but Merriam Webster at one point, gave both pronunciations. Now they only give the soft ”g” pronunciation. Who knows, maybe Doc Brown went back in time and changed it! At any rate, you won’t have to steal plutonium from the Libyans, attempt to predict a lightning strike, or even browse the web for the best deal on a Flux Capacitor to fix your Datto screenshot verification error. Just configure your server with appropriate Windows Updates settings. But what sysadmin wouldn’t drool at the thought of bringing 1.21 gigawatts of power into their server room! Great Scott!
Datto Support Services
Let our professional network and security team help with your backup support services. Start the conversation by completing the form below or give us a call at 405.810.8005.
About The Author
Donny Hilbern is a network and systems consultant specializing in analyzing, designing, and implementing network and enterprise systems. Donny has been working in the IT field for over 25 years, with nearly 20 years of that time invested in network and system administration and infrastructure technology. He has experienced a number of undocumented or lightly documented issues during that time. His desire is to leverage that experience in sharing about some of those issues and how they were resolved to make IT work for his clients.


Leave A Comment