SSL Certificate For Windows & Fortinet
How to Remove Those Pesky Warnings! It’s a Black Friday BOGO!

Have I got a deal for you! Many businesses today purchase SAN SSL certificates for their Exchange servers, Web servers, online apps, etc. These certificates generally contain several subject names so they can be used for multiple devices and services. So, include your VPN name on the certificate and use it to get rid of that pesky warning every time you connect remotely. We’re always on the lookout for the best deal. I get really annoyed when I see a retailer announcing they are having a Black Friday sales event in April or July. They may be having a sale, but the bottom line is you’re not getting their bottom line!
A History of Black Friday
There is only one real Black Friday and that’s in November, the day after Thanksgiving. You will get their best deal because on that weekend they have to compete with every other retailer who is out to do the same thing … get your business. The key is competition for business. That’s the day/weekend retailers go all out to try and turn their outlook from red to black. But Black Friday as we know it didn’t come into its own until early in the 1980’s. It had a much darker and ominous beginning, as the first reference was not to shopping but to the financial crisis in the crash of the U.S. gold market.
In 1869, investors Jay Gould and Jim Fisk conspired to buy up as much of the nation’s gold as possible in an attempt to drive up the price, then sell it for a huge profit. On Friday, September 24th, that conspiracy collapsed when the disruption in gold prices sent the stock market spiraling into a free fall and sending commodity prices plummeting by 50 percent. But Black Friday wasn’t linked to Thanksgiving until the mid-1900’s. In Philadelphia, where the Army-Navy football game was held on Saturday after Thanksgiving every year, chaos would ensue that weekend as suburban shoppers and tourists would flood into the city in advance of the big game. Philadelphia cops were not only unable to take the day off but instead had to work long hours dealing with the huge crowds, snarled traffic, and problems with shoplifters taking advantage of the bedlam in stores. In the early to mid-1960’s, the Philly cops started referring to the day as “Black Friday” to describe the chaotic experience. Of course, that idea didn’t sit well with the retailers, who attempted unsuccessfully to change it to “Big Friday” to avoid the negative implications. By the mid 80’s, retailers had come up with a plan to reinvent Black Friday into an event that would put a positive spin on the red-to-black concept of turning a profit. At one point the National Retail Federation would track sales for the special day, then for the holiday weekend. Now they don’t give sales estimates for Black Friday, rather they report on sales for the whole November-December holiday season. You can see how it has evolved. Millions of Americans will take part this year, and retail sales will be in the billions of dollars.
Somewhere along the way, retailers have made the attempt of stretching Black Friday backwards, even encroaching on Thanksgiving Day. Tweet, tweet, tweet! Loss of 5 yards and replay the down. See, to me, Thanksgiving Day is family time. You know, that one day a year you get together with members of your family that reminds you why you only do it one day a year. After all, you don’t want to miss out on Aunt Bethany’s cat-food topped Jell-O mold she only makes for family gatherings. And who doesn’t love trying to beat Uncle Frank to that last drumstick, or arguing about the horrible officiating during the big football game with Cousin Eddie, because you know he won’t let you live it down if his team wins. Nevertheless, I make it a practice of remaining with family on that day and reserving deal hunting time for the next day. Yeah, one of my pet peeve’s, but It’s sort of my little part in trying to discourage retailers from infringing on that family time for both myself, my family, and equally as important, their employees, who also deserve that time at home with their families. Black Friday should not commence until Friday, that’s my 2 cents!
So now, we make the connection of Black Friday deals to the purchase of SSL certificates. You have an Exchange server, web server, app server, etc. that all need to be authenticated by a certificate. So, you purchase a SAN certificate, giving you all those URLs as additional subject names on the one certificate. All in one, what a deal, huh? Why not take it one step further, and add your VPN name to that SAN list? Then, you can add your certificate to your firewall device where your VPN is configured.
For the majority of server systems, you will install your SSL certificate on the same server where your Certificate Signing Request (CSR) was created. Your private key will always be left on the server system where the CSR was originally created. Your SSL certificate will not work without this private key file. The instructions below will help you to export your certificate and key file, extract them individually from your export, then import them to your Fortigate firewall. Sonicwall firewalls are somewhat similar, but may not need to execute the extraction process.
Eliminate the Noise
Focus on real challenges impacting your organization by eliminating the noise of alerts, alarms, and events – hire Rattan Consulting to manage your business’s network, technology, and system security. Start the conversation by completing the form below or give us a call at 405.810.8005.
Recent Posts
How to Export, Extract, and then Import Your Certificate and Key File.
- Ensure you have an A record in your external DNS for the VPN subject name. Do this now so that it can propagate if necessary.
- Export the certificate and private key file and the intermediate certificate files from the originating server where they were created and installed.
- Click on the Start menu and click Run.
- Type in “mmc” and click OK.

- Click on the File menu and click Add/Remove Snap-in…

- Click on Add > Click on Certificates and click on Add.
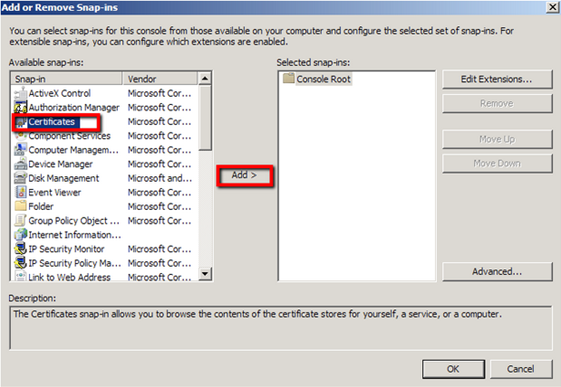
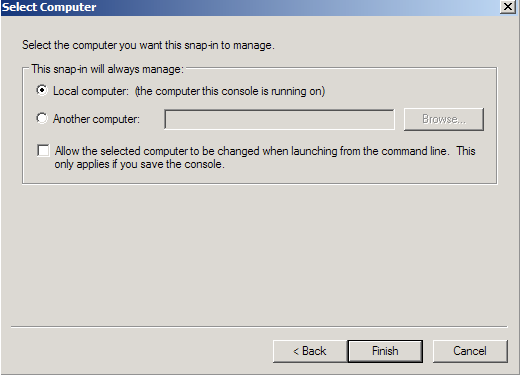
- Choose Computer Account > Next.

- Choose Local Computer > Finish.
- Close the Add Standalone Snap-in.
- Click on OK at the Add/Remove Snap-in and export the certificate to .pfx file.
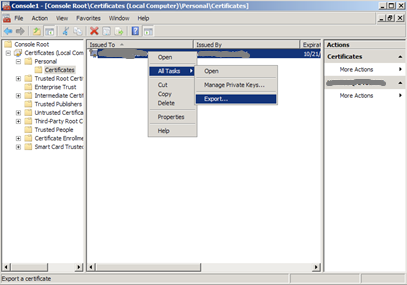
- In MMC, expand Certificates (Local Computer) in the left window.
- Expand the Personal folder, and then click on Certificates.
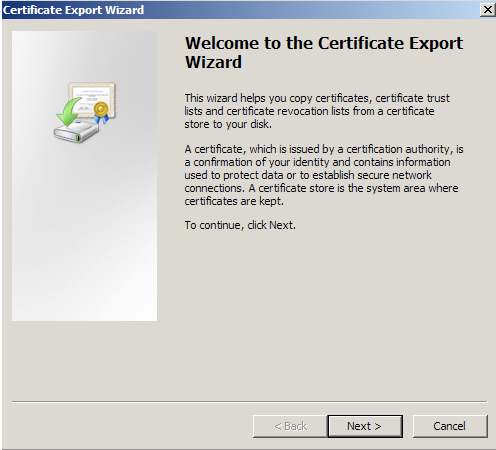
- Right Click on the Certificate you would like to backup and choose > ALL TASKS > Export.
- Follow the Certificate Export Wizard to backup your certificate to a .pfx file.
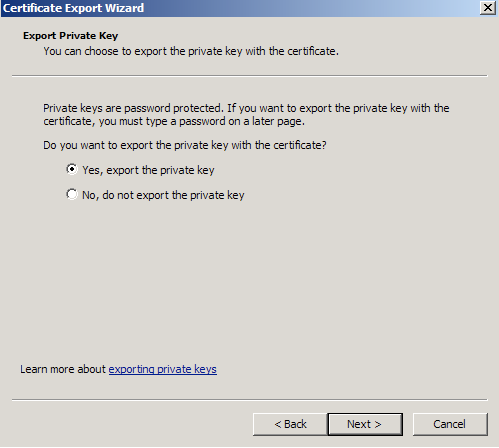
- Choose to ‘Yes, export the private key’.
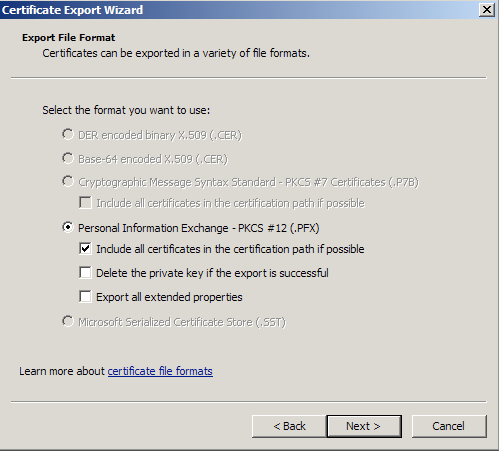
- Choose to “Include all certificates in certificate path if possible.” (do NOT select the delete Private Key option).
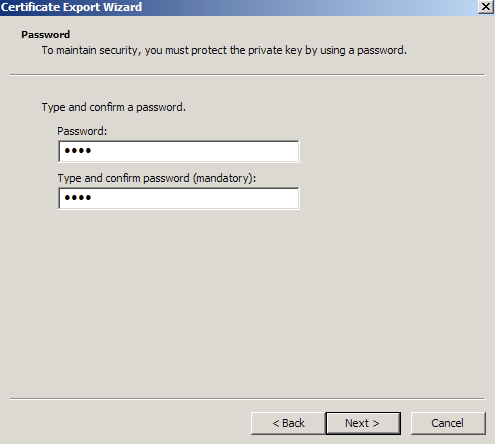
- Enter a password you will remember.
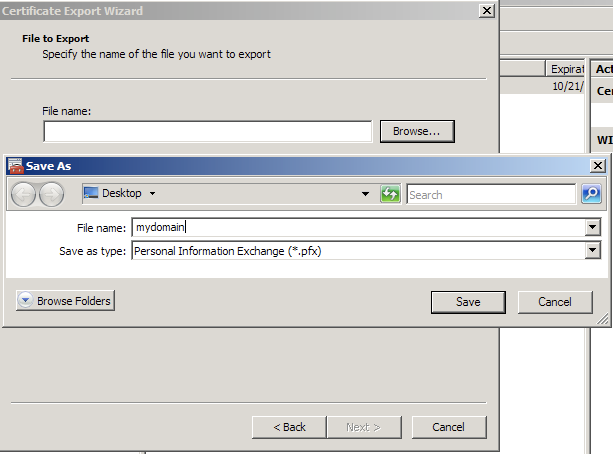
- Click Browse and find a location to save the .pfx file to. Type in a name such as “mydomain.pfx” and then click Next. Recommendation is to create a new folder to contain your exported certificate files.
- Click Finish.
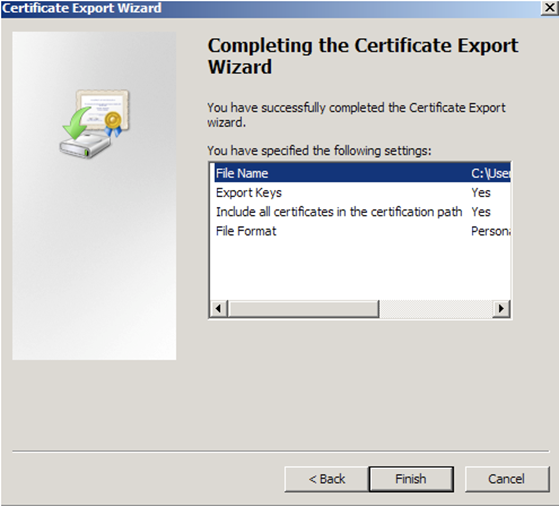
- You will receive a message > “The export was successful.” > Click The .pfx file backup is now saved in the location you selected and is ready to be moved or stored for your safe keeping.
- Run through the process again, exporting the certificates from the Intermediate Certification Authorities store. There will probably be 2.
- Copy the cert/keyfile to your local machine, say to C:\Temp\Certs for manipulation.
- Two separate files must be generated from the .PFX file. The first one must contain the private key, the second the certificate required for authentication.
- Download and install OpenSSL on your machine.
- After you install OpenSSL, you can start it from its Bin folder. Recommend to put OpenSSL\Bin in your path so you can start it from any folder.
- Fire up a command prompt and cd to the folder that contains your .pfx file.
- First type the first command to extract the private key: openssl pkcs12 -in [yourfile.pfx] -nocerts -out [keyfile-encrypted.key] – – – – – – – What this command does is extract the private key from the .pfx file. Once entered, you need to type in the import password of the .pfx file. This is the password that you used to protect your keypair when you created your .pfx file. If you can’t remember it anymore you can just throw your .pfx file away and re-export it, because you won’t be able to import it again, anywhere! Once you enter the import password, OpenSSL requests you to type in another (PEM) password, twice! Use the same password you used for the original export
- Then, type the second command to extract the private key: openssl pkcs12 -in [yourfile.pfx] -clcerts -nokeys -out [certificate.crt] Press enter and then enter the import password again from the original export process. You will have your certificate.
- You may decide to make your certificate folder on your local machine and the one on the server mirror each other.
- Backup the configuration on the firewall.
- Go to System > Dashboard > Status and locate the System Information widget.
- Select Backup beside System Configuration.
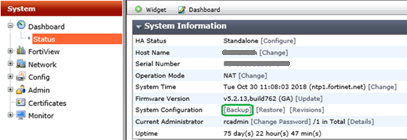
- Choose either Local PC to save the configuration file.
- Select Backup.
- Enable Certificates on the Fortigate firewall and import the certificates.
- In the management interface, go to System/Config/Features, click Show More, after the screen refreshes, find Certificates and turn it on. Then, click Apply.
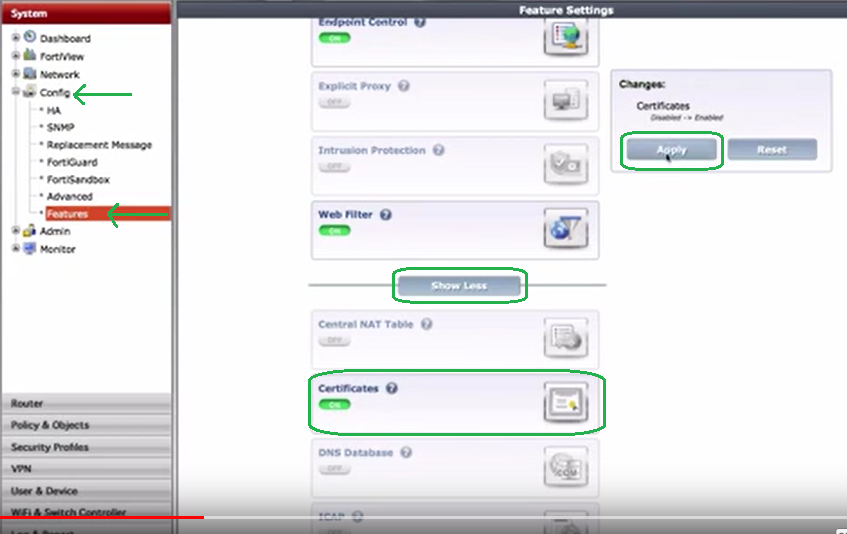
- You will see the Certificates folder appear in the System tree.
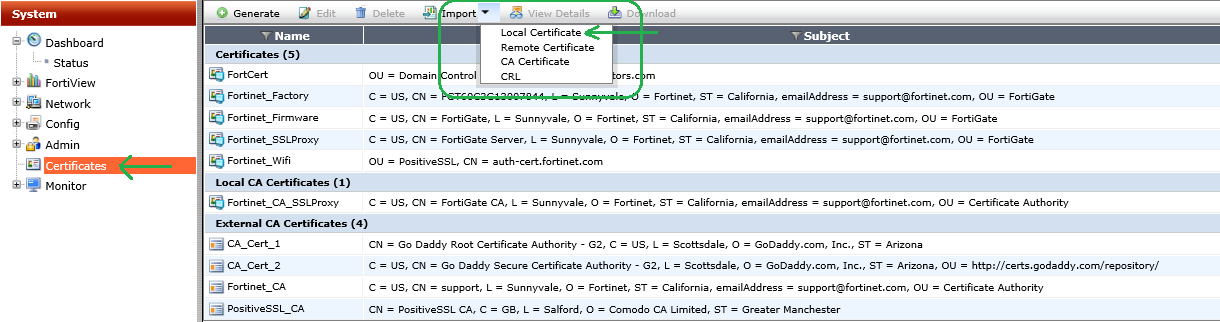
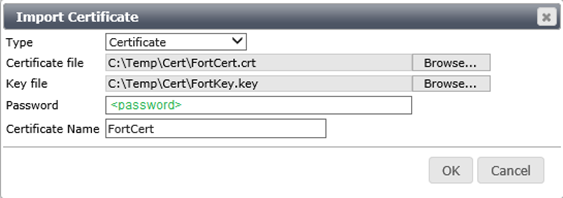
- In the Import Certificate dialog box, drop down the menu for Type and choose Certificate.
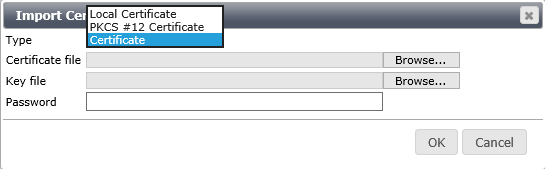
- Select the Certificate File and Key File and provide the private key encryption PW. You should have created a new PEM password with the key file when you extracted it that matched the password you created for the .pfx export, and click OK.
- You’ll see your new certificates appear in the list.
- Click Import again, and this time select CA Certificate, then select Local PC, browse to and select your first intermediate certificate. Click OK to import.
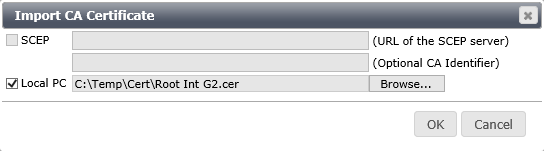
- Repeat the process for other intermediate CA certificates
- In the management interface, go to System/Config/Features, click Show More, after the screen refreshes, find Certificates and turn it on. Then, click Apply.
- Verify you can ping your VPN url at this point.
- Configure the Fortigate VPN to use the new SSL certificate.
- Browse to VPN > SSL > Settings.
- In the Connection Settings section under the Server Certificate drop down select your new SSL certificate. Click Apply.

- This is also the screen for setting the connection port and the Inactive Timeout. You have configured the Foritgate VPN to use the new SSL certificate.
- Reconfigure the Forticlient to use the new url (and SSL port).
- Configure the management console to use the SSL certificate.
- In System –> Admin –> Settings choose the imported certificate from the drop-down menu in Administration Settings.
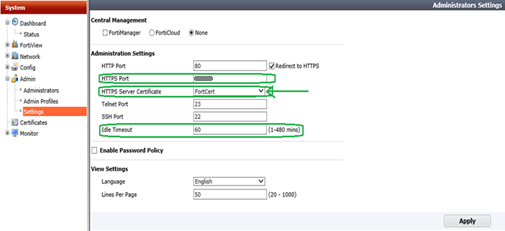
- You can also configure the firewall management port from this screen, as well as the Idle Timeout for the admin session. Note: After setting the cert in this section and applying the setting, it appears the firewall reboots. It is unavailable and does not refresh for 2-3 minutes.
- In System –> Admin –> Settings choose the imported certificate from the drop-down menu in Administration Settings.
- Install the SLL certificate in your browser (You may need to restart your browser after these steps).
- Microsoft IE
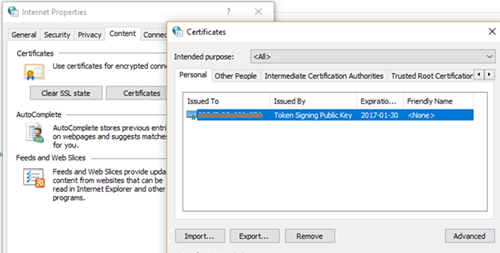
- Go to Tools > Internet Options. On the Content tab, select Certificates.
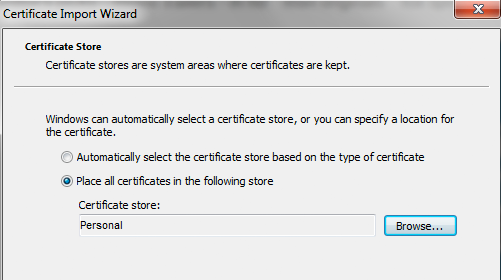
- Go to Personal and import the certificate.
- Microsoft Edge
- Right-click the Windows Icon and choose Control Panel. Select Internet Options and choose Content > Certificates > Import.
- Import the certificate file.
- Firefox
- Depending on the version, go to Menu > Options or Preferences > Advanced and find the Certificates tab.
- SelectView Certificates, then select the Authorities.
- Import the certificate file.

- Chrome
- If you are using Chrome, you must install the certificate for the OS, rather than directly in the browser.
- Open the certificate file and select Install Certificate. The Import Wizard appears.
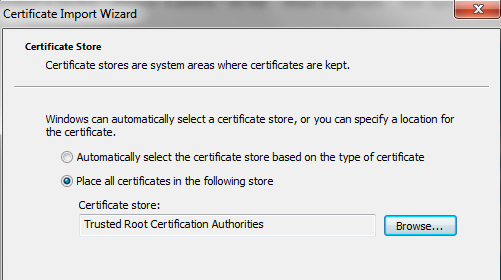
- Import the certificate into the Trusted Root Certification Authorities
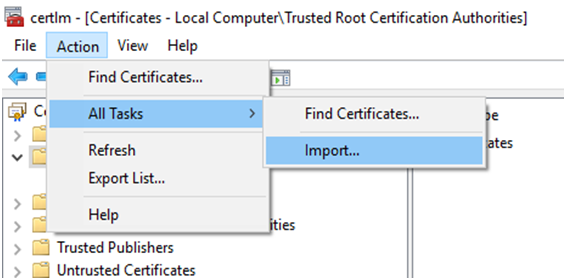
- On Windows 10, after installing the certificate for the OS, open the Start Menu, type Manage Computer Certificates and select Trusted Root Certification Authorities from the left panel.
- Select Action > All Tasks > Import from the top menu and Import the certificate.
- Microsoft IE
- Optionally, you can create an Address Object in the firewall for the new url.
- Test the VPN and the Admin console to ensure the certificate warning is gone.
Black Friday works in getting the hordes of people out to the retailers to spend money for one reason, and one reason only in my opinion. The key that drives the deals for consumers is competition. Any Marketer or Sales Zombie can pitch a “Black Friday” gimmick sales event to attempt to catch their target’s attention. Nice try, but as an astute consumer, I realize it’s just another sale. Sure, I might get a decent deal, but without the factor of all the other retailers competing for the same sales at the same time, it won’t be a “Drop the Mic” campaign. Black Friday is Thanksgiving weekend. Any other reference is just a masquerade, lipstick on a pig! That sound you just heard was me dropping the mic. The point, as it relates to certificates, is that most businesses already use SAN certificates, so just include one additional subject name for your VPN. Doing it this way will be kinder to your wallet and make your end users happier when you use the information here to add the cert to your firewall and rid them of that annoying warning. What, are you waiting for Christmas? If in the past you’ve been too cheap to provide this “fix”, or thought it might be a little complicated to implement, here’s food for thought: the past is done! What a revelation! And even if you miss the chance to get that Black Friday deal to enhance your VPN experience, it’s not too late. This deal doesn’t go away, there’s always Cyber Monday!
About The Author
Donny Hilbern is a network and systems consultant specializing in analyzing, designing, and implementing network and enterprise systems. Donny has been working in the IT field for over 25 years, with nearly 20 years of that time invested in network and system administration and infrastructure technology. He has experienced a number of undocumented or lightly documented issues during that time. His desire is to leverage that experience in sharing about some of those issues and how they were resolved to make IT work for his clients


Leave A Comment